Publishing or Submitting Work
Publishing Your Content
There are two possible ways to publish webpages that you have created or edited. Those are publishing your content yourself, or submitting for approval.
Most users will publish content themselves immediately after making any necessary edits to websites, via the publish button present on every page. If you are required to submit for approval, rather than publish directly, the button will be in the same place and the same checks will be performed, but the content will not be published until approved. Step by step directions are provided below as a refresher (the first set of directions will assume that you have publish access).
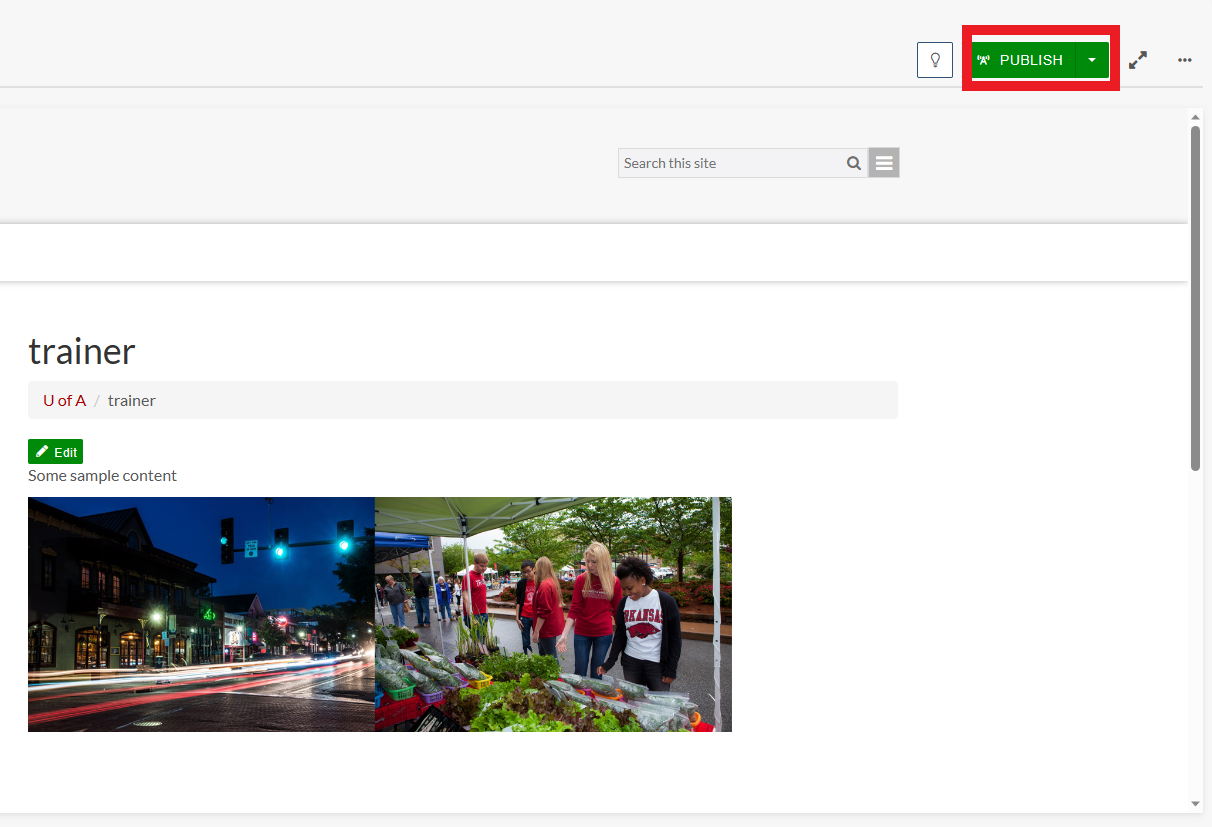
Once you have completed your edits click the green publish button to the top right of the page you were editing as seen in the below example.

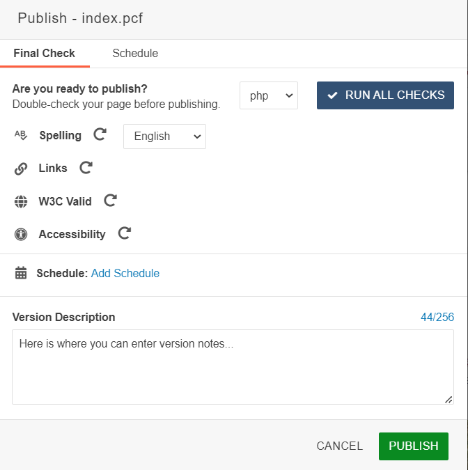
This will bring up the final checks page where you can perform spell checks, link checks, W3C checks and accessibility checks. You can also choose to schedule when the page will be published from this area as well. To finalize the publish, simply enter any version description notes and click the green publish button.
After this the system will publish the page and give you the option to see the published file by clicking on the pop up in the lower left corner of the screen. Do this and you can ensure that the page looks like it should.
Note: If something looks weird here go ahead and do a hard refresh this page. Ctrl + F5 on windows and Command + F5 on Macintosh.
While this may be the simplest way to publish/submit there are other places you can publish from as well, these are detailed below, and can sometimes come in handy if you have multiple files to publish at once.
Remember, each page has a green publish or submit button that is on the top right and clicking this button will also allow you to run the same checks previously mentioned and complete the publish action.
Alternate Way to Publish Your Content
If you have the access to publish the content directly, then one way to do so is to follow the directions below.
- Click on Content>Pages in the Global Navigation and then click on the Home icon (the first icon in the Breadcrumbs).
- Navigate to the content you want to publish.
- Remember that some of your pages will be in folders, depending upon which section they are in.
- You’ll see that any unpublished content is labeled as such.
- Check the box(es) for the content (image, document, video, page, section, etc.) you want to publish. You can select multiple files simultaneously.
- Click Publish.
Note: Be sure to thoroughly Preview before publishing, especially if you publish multiple files.
- This brings up the final checks page where spell check, link check, and accessibility checks can be performed.
- Any version notes can also be entered.
- Once all checks are completed and notes entered, click Publish one more time and the page will go live.
Submitting Content for Approval
Both options are in the same place in the Modern Campus CMS system, to submit content for approval follow the steps below.
- Click on Content>Pages in the Global Navigation and then click on the Home icon (the first icon in the Breadcrumbs).
- Navigate to the unpublished content you want to submit.
- Remember that some of your pages will be in folders, depending upon which section they are in.
- You’ll see that any unpublished content is labeled as such.
- Click on the content to open it (it automatically puts you into Edit Mode.)
- Click Preview to check over it one last time.
- Click Submit.
- Select an approver. You can partially type their name to reduce the amount of scrolling.
Note: If the approver has been enforced by your administrator then you cannot select a different approver.
- Write a Subject and Message as appropriate.
- Check the box “Send Copy To Email”, which will send an email to the user along with the Modern Campus CMS message. Remember that the Inbox in OMNI is not a function that UARK is currently using.
- Click Submit.
- You’ll see a message that it is now pending approval. The file is now locked to that approver.
- Repeat as needed. Remember that uploaded files (images, videos, etc.) Included Files (_nav.inc) and Public Content Files (index.pcf,_props.pcf, etc.) must also be published. Don’t forget where they are stored!
