Creating New Content
Introduction
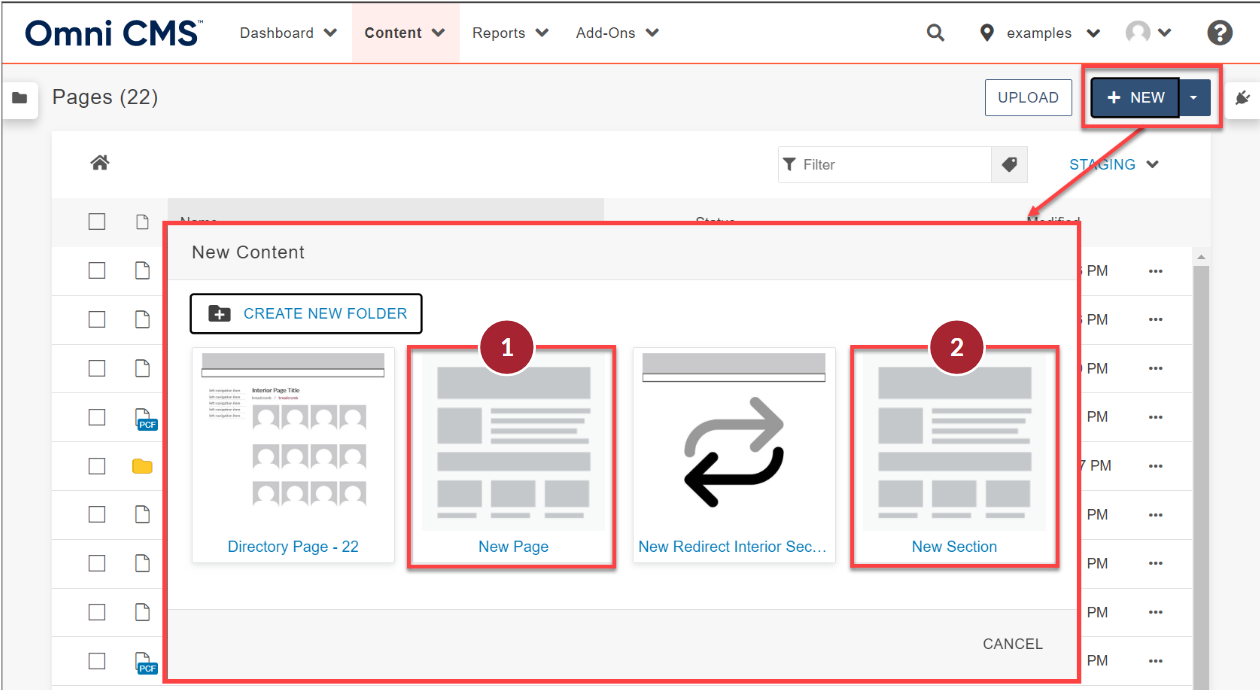
In Modern Campus CMS, the +New button gives you the option to create new pages. There are three types of pages that UARK users may create:
- Page
- Section
- Directory pages (please reach out to Digital strategy team or a webmaster for assistance)
Note:You may see other types of new content under the +New button, do not use them.
Creating a New Page
- In the Global Navigation Menu, click Content>Pages
- Click the green +New button at the top right.
- Select New Page.
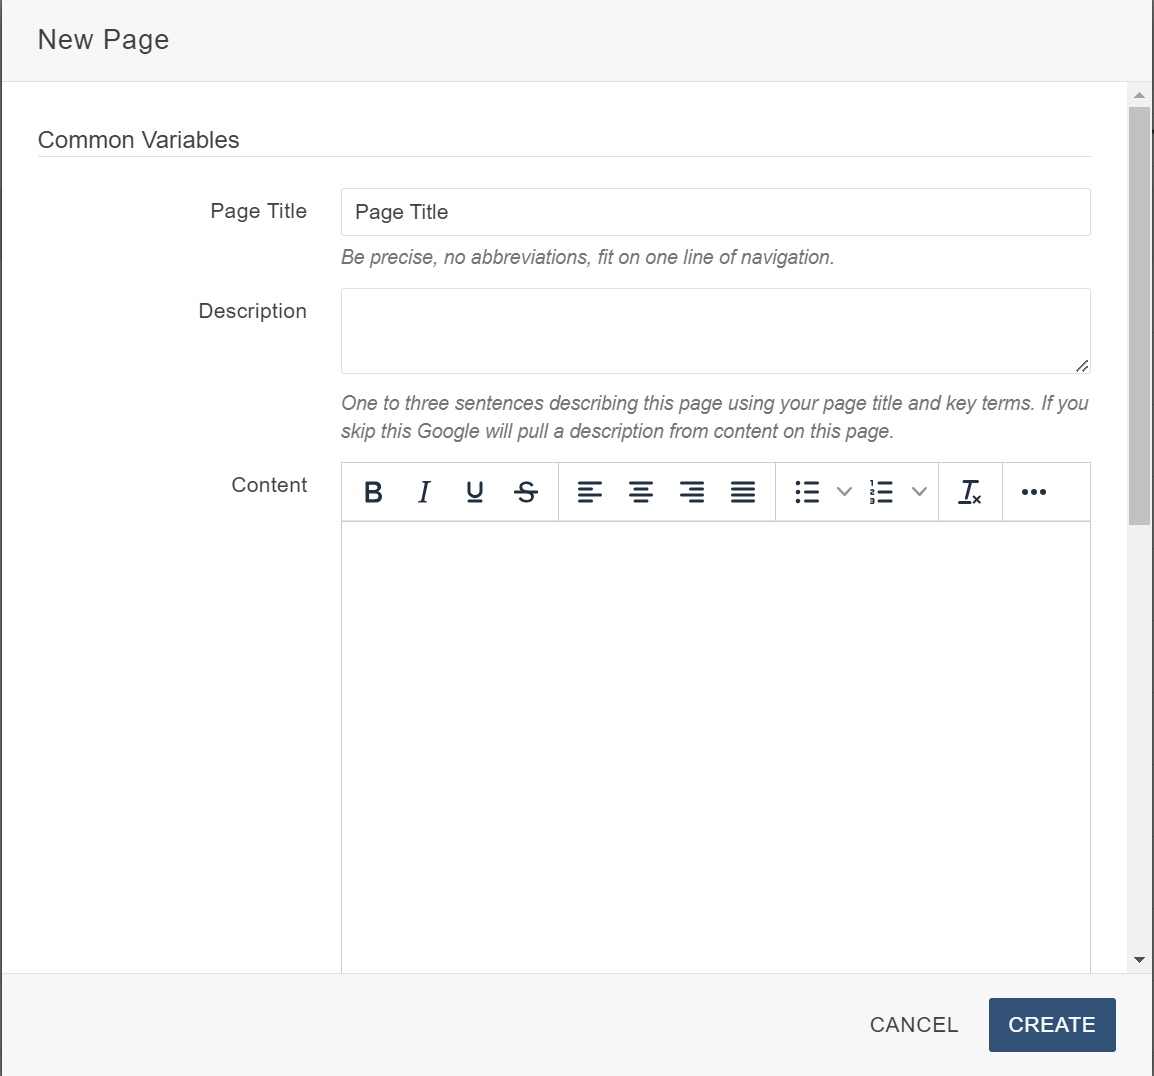
- Once you select new page a widget will appear with fields to fill in, these fields are explained in detail below, along with a quick summary of what each field does. Each field also has a few guidelines associated with it to ensure compliance with UARK’s web policy.
Common Variables
- Page Title: Name your page as you would like it to appear on the page while adequately describing
your page.
- EX: Black Mazda 626
- Description: Describe your page so that when someone searches for it, the description will tell them what they need to know about the page
- Content: Content is added in the WYSIWYG (What You See Is What You Get) Editor. You can add your specific content here now or wait and add it after you have created the page.
Navigation
- Add Navigation Item: If you select yes then the page will be added to the side navigation.
- Page Layout: Choose the desired page layout, default is “Fixed Width”
- Page type: Choose whichever page type is consistent with the look that is desired for the section, the default option is “Interior Two column” with left sidebar navigation.
New Page Options
- Filename: Use the Page Title, replacing the spaces with dashes. Use lowercase letters only and leave the ‘.pcf’
as the file extension.
- EX: black-mazda-626.pcf
- Access Group: (Inherit from Parent)
Create, Preview and Edit
- After you have filled out the New Page form, click Create.
- If you have uploaded any images, you will only see a placeholder, but not the actual image (unless the image has already been published). Once you publish the page, you’ll see the image.
- Click Preview to see the page as it will be on the website (including any unpublished images).
- You will see a link to the page you created in the left navbar if you selected to include that when creating the page.
- Click the green Edit button in the Edit area to re-open the WYSIWYG Editor and make changes.
- Click Save when all edits have been made.
Creating a New Section
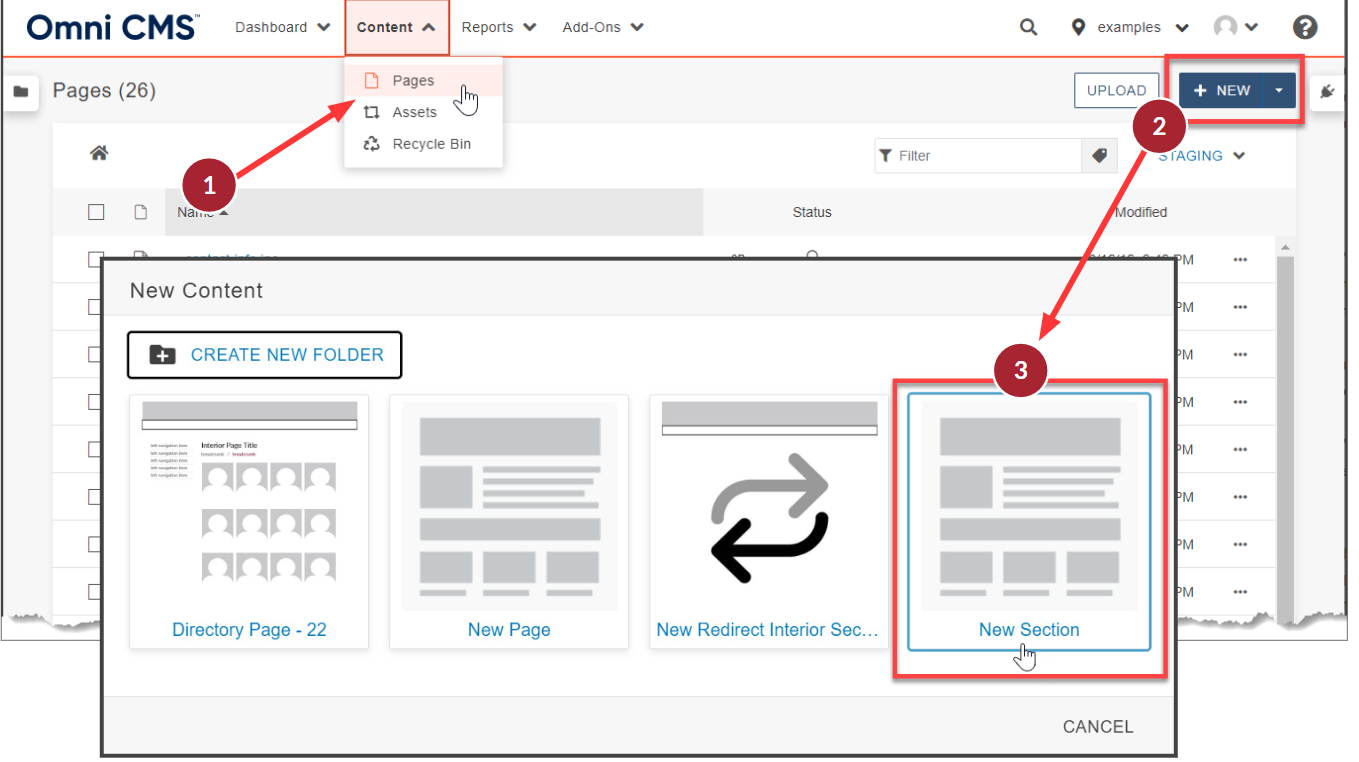
- In the Global Navigation Menu, click Content>Pages
- Click the green +New button at the top right.
- Select New Section.
- Fill out the form according to the New Section Guidelines listed below.
New Section Guidelines
The guidelines for creating a new section ensure all UARK webpages have a consistent format and structure.
Folder Variables
- Folder Name: Describe the new section using lowercase words, separated by dashes (-).
- EX: my-first-car
- Keep Search Engine Optimization (SEO) in mind when creating the section name.
- Breadcrumb Name: Enter the name of your page as it will appear in the breadcrumb. This will be displayed in the breadcrumb.
- EX: My First Car
Note: Breadcrumbs
This shows up at the top of the web pages primary content and reflects the site path to the page you are looking at. Breadcrumbs are built using a combination of text in the props.pcf file and the page titles. The index.pcf title must match the content in the props.pcf to avoid duplication.
Common Variables
- Page Title: Name your page as you would like it to appear on the page while adequately describing your page.
- Description: Describe your page so that when someone searches for it, the description will tell them what they need to know about the page
- Content: Content is added in the WYSIWYG (What You See Is What You Get) Editor. You can add your specific content here now or wait and add it after you have created the page.
- Navigation
- Add Navigation Item: If you select yes then the page will be added to the side navigation.
- Page Layout: Determines the layout, the default option is “Fixed Width”
- Page type: Choose whichever page type is consistent with the look that is desired for the section, the default option is “Interior Two column” with left sidebar navigation.
Create, Preview and Edit
- After you have filled out the New Section form, click Create.
- If you have uploaded any images, you will only see a placeholder, but not the actual image (unless the image has previously been published). Once you publish the page/section, you’ll see the image.
- Click Preview to see the section as it will be on the website (including any unpublished images).
- You can see the new section in the top nav-bar, with the page you made as part of the section listed in the left navbar.
- Click the green Edit button in the Edit area to re-open the WYSIWYG Editor and make changes.
- Click Save when all edits have been made.
Three Files Automatically Added to Every New Section
- inc => this will control the side navigation of the section
- props => this file controls the properties of your new section
- index => this is the actual page for the section, which is where your content will appear.
Locating Your New Sections and Pages
- After your new page is created, you will be ready to edit or publish.


